Using SSH Keys to Login to Your Server
The default and most common means of logging into your server over SSH is through using a password. The problem with this is that you leave open the possibility for an attacker to try log in to your account by guessing your password multiple times until they get it right. Attackers can run continuous dictionary or brute force attacks on your SSH account until they get it right. Often these will be automated, so there is no problem for an attacker to run thousands of attacks per hour.
If your server is exposed to the internet you will find that this is definitely going to be something you have to contend with. There are automated bots attacking any and all SSH accounts they find online, so you have to be prepared.
One step you can do is to install Fail2Ban, to limit the attempts an attacker can have at guessing your password. A more secure means of logging onto your server though is using SSH keys. With this method there are no passwords involved at all.
Two keys, or files containing cryptographically calculated content, are generated. One is saved to your server, the second is saved on your computer or laptop, known as the client, which you will be using to log on to that server. The first is known as the Public Key, the second, is known as the Private Key.
When you connect to a remote server, you encrypt the connection using the key on your computer or laptop (the Private Key). If the server has a matching key in its list of authorised keys, it will accept the connection and allow you to log on. No passwords are needed.
In this article we are going to create keys using PuTTY, as you will most likely be using this on your laptop to log in to your server. In another article I will cover how to log in from server to server using SSH keys.
In the process of key generation, what happens is the client (your laptop) generates two keys, the Public and Private keys. The Private key never leaves the client. The matching Public key though is copied to the server. When you next use PuTTY to connect to your server, the connection is encrypted using the Private key. The server can now decrypt this using the Public key, and knows that these connections can be trusted, so it accepts the connections. In the final step, you can configure your server to stop accepting password connections, thus locking out any attackers who are trying to brute force a password connection.
Key Generation Using PuTTY
PuTTY comes with a tool for generating keys called PuTTYgen. This is not part of the PuTTY tool itself though, but a separate tool which is installed when PuTTY was installed. Search Windows for PuTTYgen and open it up.
Ensure the Parameters are set to SSH-2_RSA, and the number of bits are 4096. The default is for 2048 bits, but doubling that ensures the encryption strength of your connections to your server will be un-breakable for a long, long time yet. Click the Generate button.
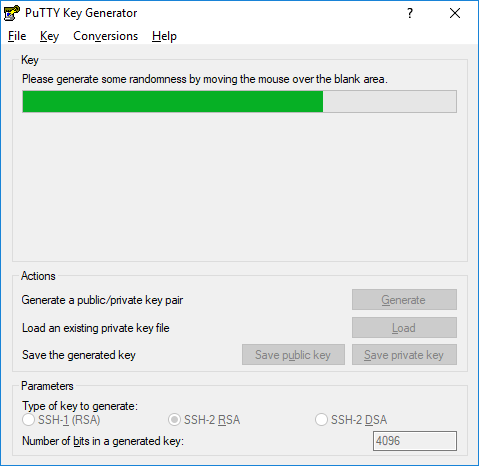
Move your mouse around the area beneath the progress bar in order to generate randomness for the keys. Once the keys are generated, the Public key is shown in the window at the top of the tool. This is the key which you will need to upload to the server.
There are buttons beneath to save the public and private keys. Save the private key to somewhere secure on your laptop. I would recommend saving it under your username account, i.e. C:\Users\
There are two ways to save the Public key: you can click the button to save a copy of it, or you can copy and save it from the Public key window. The format of the file from the two options differs slightly, and to be honest I have found that copying and pasting the public key works better when it comes to uploading it to the server and having the server accept incoming connections.
Your two keys (Public and Private) are now ready for use.

Uploading Key to the Server
To upload your key to the server, SSH in using your password and go to your home directory. Check if you have a directory called .ssh in your home directory:
ls -la
If you do, you can skip the next step. If you don’t you will need to create it and restrict the permissions so only your user can access it:
mkdir .ssh
chmod 700 .ssh
Move into the .ssh directory and open or create the file ‘authorized_keys’ if it is not there already
cd .ssh
nano authorized_keys
Copy your Public key and paste it into the authorized_keys file. Save and exit (Ctrl + O, Ctrl + X). That’s it, all done on the server side. There is no need to restart the SSH service or anything further. Type ‘exit’ to log off.
Creating a Secure Connection
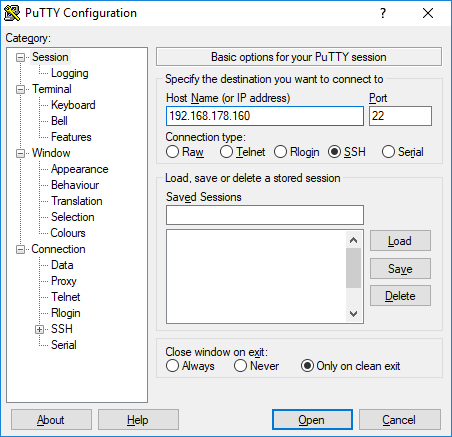
Open up PuTTY and enter the IP address or hostname of your server, set the port to 22 and tick SSH for Connection Type.
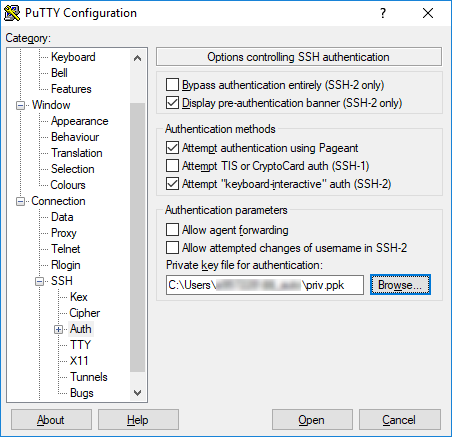
On the left hand menu, down near the bottom there is an option under Connection for SSH. Tick the [+] button to expand that menu, and click on Auth.
The last option allows you to select your Private key file for authentication. The Private key, remember, never leaves the client device, i.e. your laptop. Click Browse and select and add your key file.
Going back to the Session menu and clicking on Save allows you to name and save this configuration.
Click Open to open a connection to your server using the new key files. You should find yourself quickly logged into your server without having to enter a password.
If you find that it doesn’t work the first time, log off and try again. I have found that the first connection sometimes doesn’t work but the second attempt does.
Disable Password Logins
The next step is to disable password logons. For security reasons, as discussed above, this is a good step to take, but to be clear, there is nothing wrong with leaving this as is. If you are interested in using certificates for the convenience of logging in automatically, you can leave password logons enabled, but for servers facing multiple and prolonged SSH attacks, this is a wise step to take. You just have to be sure that you make and save (in a very secure location) a backup of the private key saved to your laptop.
IMPORTANT! Before disabling password logins, test to make sure you are able to login using keys. If you disable password logins before testing this, you risk locking yourself out of your server.
SSH onto your server, backup the SSH config file and then open it
cd /etc/ssh/
sudo cp sshd_config sshc_config.BACKUP
sudo nano sshd_config
Then disable password authentication by uncommenting the Password Authentication file and changing its setting to ‘no’.

Restart the SSH service and logout. You would have already tested your SSH keys, but try removing the key from your PuTTY connection and test that your connection is indeed rejected.